Make your Photo look Cinematic FAST! Photoshop Tutorial
Wednesday, 27 December 2017
Sunday, 24 December 2017
Ten Shortcuts for Working With Layer Masks in Photoshop
Out of all the things you need to know how to work with in Photoshop, layer masks are one of the most fundamental and important. This awesome and quick video will show you ten shortcuts for working with layer masks in Photoshop.
At its core, the idea of the layer mask is extremely simple: it allows you to show or hide certain parts of an image or adjustment. Of course, in practice, creating and manipulating layer masks is an intricate and nuanced art all itself and a skill every photographer working in Photoshop should have down pat. And since they're something you'll use on the overwhelming majority of images you work with, any shortcuts can help increase both their capabilities and your workflow's efficiency, which is exactly what this helpful video from the folks at Adobe will show you how to do. Of all the shortcuts, the ability to quickly duplicate a layer mask is probably my favorite. A lot of the time, particularly when I'm retouching a portrait or landscape image, I'll want to apply three of four adjustments to the exact same area, and rather than trying to paint in each effect, it's much quicker to just duplicate the layer mask after doing it once. Check out the video above for all the tricks!

The Christmas Wish Project Brings Even More Smiles to Sick Children for 2017
The Christmas Wish, which has become an annual viral sensation put out over the last few years by The Heart Project is back and even bigger for 2017. In 2016, the project created holiday magic for 30 sick children from one hospital. This year Karen Alsop, the lead photographer behind the project, took it countrywide in Australia reaching even more people in need and this is just the beginning.
The Heart Project produces consistent heartwarming projects that connect artists with sponsors to create amazing photo collages for children and families who are undergoing some type of hardship. Back in October, I wrote about The Get Well Tree which resulted in a beautiful children's book designed to help and inspire children in hospitals going through difficult recovery. Each new project is even more amazing and a perfect example of how photography and a group of artists can use their talents to bring a smile to people in need.

How to Add a Soft, Warm Glow to Images Using Photoshop
A very popular and fun look for portraits and candid shots is a warm glow that seems to emanate from a soft, out-of-frame light source. This fun and easy tutorial will show you how to add that same glow to your images using Photoshop.
Coming to you from Aaron Nace at Phlearn, this great video will show the process for adding a warm glow to your images in Photoshop. If you're like me in any way, you're eternally cold in the winter and you'll do anything to feel warm again, even if it means Photoshopping the warmth (maybe it's time for me to step away from the computer for a bit). Nonetheless, this is a fairly easy thing to do, and the video will teach you how to use gradients to create natural tonal transitions quickly and easily across the frame. In addition, the effect is easily adjustable after you add it, making it no problem to adjust things more to your liking, such as increasing the size of the source to decrease the harshness of the transitions, etc. It's an easy technique that can breathe an entirely different mood into images, so grab one from your catalog and give it a try!
How to Use and Photograph Real Snow for Overlays in Photoshop
It might be the most wonderful time of the year but that doesn't mean there will be snow falling for your photo shoot. In this video, you’ll learn how to photograph and use real snow for overlays in Photoshop.
There are plenty of tutorials online that can show you how to make snow in Photoshop, but nothing beats the real thing. Anyone can do this simple technique to bring organic looking snow into their photos. You only need a few basic things: a black or gray backdrop to place outside, a tripod, and a camera. After you have the photos you need, you simply bring them into Photoshop and change the blend modes. The independence of the layers to the original image will allow you plenty of freedom to make changes and have control over what the final image looks like. This technique is great for people who live in climates that don’t get snow frequently. It’s also a great backup if you planned a shoot in the snow and the forecast changes at the last minute. Once you have even a dozen photos of snow falling, you will be able to reuse them over and over again without the overlays looking repetitive.
How to Add Lipstick to a Subject Using Photoshop
Lipstick can be a great addition that can complement a subject's eyes or really help a colorful portrait pop all the more. If the subject wasn't wearing it already, this helpful video will show you how to convincingly add it after the fact using Photoshop.
Of course, it's always great if you have a makeup artist or your subject wears lipstick to the shoot, but sometimes, you sit down to your computer and realize you would prefer to change something, which is why Photoshop was given to us by the ancient photographers all those millennia ago (or something like that). Coming to you from Unmesh Dinda of PiXimperfect, this helpful video will show you how to properly add it in a way that matches how lipstick behaves under light. It's more than just changing the color of the lips, as lipstick also adds shine and depth, and by working with the highlights and shadows separately in tandem with using multiple solid color adjustment layers and the Blend-if sliders, you can effectively mimic the look. And remember, while the video shows a traditional red color, the technique should work for just about any color you'd like.
File Formats for Photographers in Lightroom and Photoshop
Greg Benz, creator of the luminosity masking Photoshop script panel Lumenzia, is one of those experienced photographers who doesn't hesitate to share their technical knowledge with followers. In his latest video, he explains file formats in detail, both for Photoshop and Lightroom.
This tutorial explains how to use which file format, bit depth, and color space while working in Photoshop and Lightroom. The video starts with Benz’s explanation of color spaces in Lightroom and his recommendations about how to use them throughout the workflow. He then explains the importance of 16-bit depth, especially when dealing with luminosity masks for better image processing.
While showing the differences between file saving and file handling properties supported by Photoshop and Lightroom, Benz also shows the TIFF saving options, including the image compression types. On the second half of the video, Benz shows some image samples saved with different options in various formats, which have different benefits when using different hard drive types. Therefore, the video shows the workflow options from opening the raw image to save as the final image.
Please feel free to share your tips about file formats in the comments section below.
A Quick Tutorial on a Better Way to Brighten Portraits in Photoshop
When you're shooting portraiture, particularly outside without artificial lighting, you'll often need to brighten your subject a bit in post. This can create a few issues, but this helpful video will show you how to obviate those potential problems and create a higher-quality result.
Coming to you from Aaron Nace of Phlearn, this helpful video shows you how to handle a situation you'll likely run into quite a bit if you're shooting natural light portraits: fixing an underexposed subject that's a consequence of protecting the highlights elsewhere in the image. The problem is that shadow areas often hold less color and have a somewhat different different color temperature than the highlights, which can lead to an undesirable look if you simply brighten your subject. As such, you'll need to adjust the hue and saturation on your subject a bit to achieve a more natural result, which Nace guides you through in the video above. A quick tip: make sure you split the Blend-if sliders as he shows. This feathers the transition into the adjustment layer instead of creating a hard edge, which ensures that you get a natural result. It's a great technique for portrait and wedding photographers to have in their bag of tricks.
Five Reasons to Use Smart Objects in Photoshop
If you're new to Photoshop, Smart Objects can seem a bit foreign, but they're extremely helpful when you're doing certain kinds of work. This informative video will show you five reasons to consider using them when you're working in Photoshop.
Coming to you from the Adobe Photoshop team themselves, this helpful video will show you some of the biggest benefits of working with Smart Objects in Photoshop. If you've not heard of them before, a Smart Object is a layer that uses data from either a raster or vector image while preserving the original information. This enables a multitude of capabilities, such as the ability to perform geometric transformations on the layer nondestructively (and thus, undo them without penalty) or use filters nondestructively with the ability to update their settings whenever you please. On the other hand, you can't do anything that changes pixel-level information in a Smart Object, such as using the Clone Stamp tool or dodging and burning, as it would need to be rasterized first. Nonetheless, for layers on which you won't be doing any pixel-level editing, they can offer you an additional bit of flexibility. Check out the video above for a good walkthrough of their usefulness.
Photoshop’s Select and Mask Sliders Explained
Creating a precise selection in Photoshop is one of the essential tools that a photographer should understand. The best way to select an object by explaining how each of the adjustment sliders affects a selection.
If you have used Photoshop, you should be familiar with the Magic Wand Tool and the Quick Selection Tool. They both do a decent job of selecting the general area that you want. However, you also have probably experienced a lack of accuracy in targeting the smaller details of a selection. Not only do these tools misjudge many areas, but the final selection is usually left looking uneven and jagged. If you are trying to cut out an image or mask something off, these imperfections become very noticeable.
This video shows us what method Dinda would use to very precisely select an object and then mask off the background. After making a rough outline, he uses the Select and Mask tool to get a more accurate selection. The great thing about this tutorial is that it first explains each slider in the Select and Mask workspace. Then, Dinda shows the technique he uses to incorporate all of these tools to get the selection he desires. Lastly, he adds a few helpful tips on perfecting the mask.
Even if the Select and Mask tool is something you are familiar with, this is still an excellent video for most users. His technique in using the sliders was new to me and reveals several tips that will save a great deal of time on selections in the future.
Adobe Photoshop,
Computer application software used to edit and manipulate digital images. Photoshop was developed in 1987 by the American brothers Thomas and John Knoll, who sold the distribution license to Adobe Systems Incorporated in 1988.
Photoshop was originally conceived as a subset of the popular design software Adobe Illustrator, and Adobe expected to sell a modest several hundred copies per month. Expectations for Photoshop’s success were tempered by concerns over the capabilities of personal computers (PCs) in the early 1990s to run the program because it required more computer memory than most PCs came with or even, in some cases, than could be installed. Nevertheless, the software sold well, driving sales of newer PCs with more memory and becoming known as one of the first “killer apps” (an application that influences hardware sales). Photoshop became integral to many diverse industries, including publishing, Web design, medicine, film, advertising, engineering, and architecture. In 1995 Adobe purchased the rights to Photoshop from the Knoll brothers for $34.5 million. The demand for Photoshop rose as computers improved and digital photography technology advanced. The program’s success spawned companies that produce add-ons designed specifically for Photoshop compatibility.
The anti-Photoshop act that wants to stop advertisers from editing women
This isn’t entirely the fault of Photoshop, of course. While the name of the program has become synonymous with photo editing of any sort, photos were edited long, long before Adobe went to market — and arguably, people have “edited” their appearance, via cosmetics and corsets and other means, since even earlier than that. But Photoshop made such editing easy. Mainstream, even. (A review of the “idiotproof” consumer version, from 1995: “if you own a digital camera or a scanner, you can now do your own photo retouching!”) The first version of the software, released in 1990, allowed basic edits like stretching and skewing and smudging and blurring. The second version improved on things like color handling. By the sixth version, Photoshop could “heal” blemishes, layer pieces of different images on top of each other, and “liquify” the whole thing, the better to smooth out bulky forearms or too-wide waists.
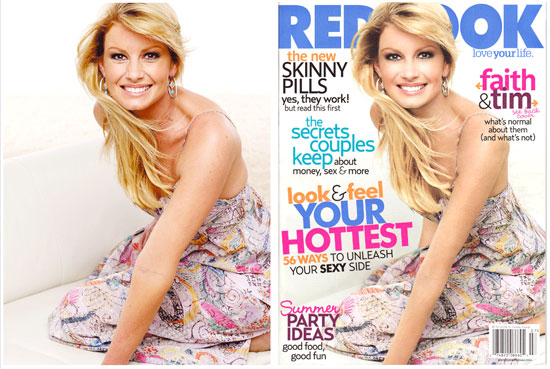
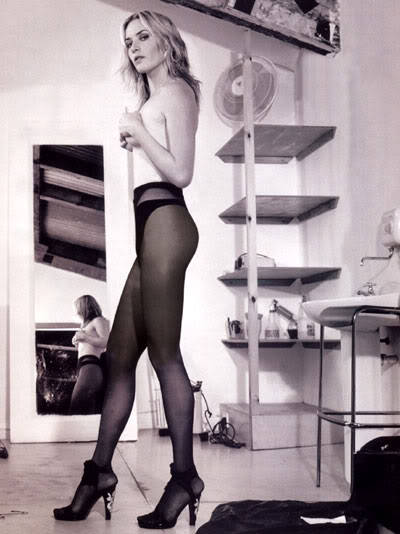
Before long, “Photoshop” referred not only to a piece of software, but to a constellation of social evils, most of them visited on women: the pressure to be beautiful and unblemished and thin, the media’s complicity in this campaign, the plummeting self-esteems of girls and young women who grew up believing they should look that fake, Photoshopped way. Faith Hill whittled to nothing on the cover of Redbook. Kate Winslet with yards-long legs in the British version of GQ. Julia Roberts’s Lancome campaign banned in Britain, over concerns that it didn’t “reflect reality.”
Just last month, a high school student made waves when she published copies of her yearbook pictures, which were edited by the photographer to make her appear thinner. “I was outraged!” The girl wrote on Reddit. “When we go and have our photos taken we are flat out told that our skin will be retouched to hide blemishes. We are not told, however, that more drastic changes are [also] made.” It seems appropriate, in hindsight, that the first photo ever Photoshopped was a picture of a faceless, topless woman, sunning herself at the beach. She was “the last woman,” Gordon Comstock wrote, “to inhabit a world where the camera never lied.”
Now the question is: Do cameras ever tell the truth? After all, photo-editing has evolved far beyond Photoshop; Adobe, at this point, is for magazines and advertisers and other professionals, the people charged with giving Beyoncé’s face that otherworldly, poreless glow. For your average smartphone-carrier, there are lower-budget tools: Instagram filters, selfie-enhancing apps, any number of free online tools. Every major social network has built photo-editing features into its app, the better to let users “touch up” the look of their lives.
Wednesday, 20 December 2017
Tuesday, 19 December 2017
Saturday, 9 December 2017
Subscribe to:
Posts (Atom)

-
Advance Snow/Winter Photo Effect Editing Tutorial ll Photoshop tutvid Photoshop tutorials for beginners to advanced. [Photoshop CC] [Ado...
-
 The Christmas Wish Project Brings Even More Smiles to Sick Children for 2017 The Christmas Wish , which has become an annual viral se...

